
The Perfect Switch Case
David Bastedo designed The Perfect Switch Case and Christy Lutz engineered the pattern.
David Bastedo designed The Perfect Switch Case and Christy Lutz engineered the pattern.
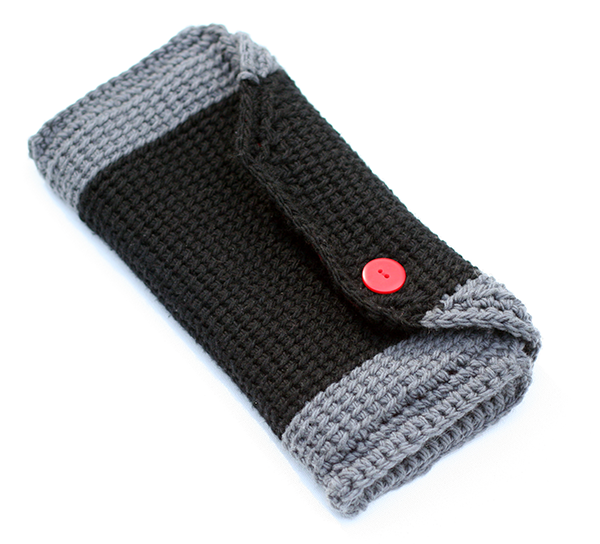
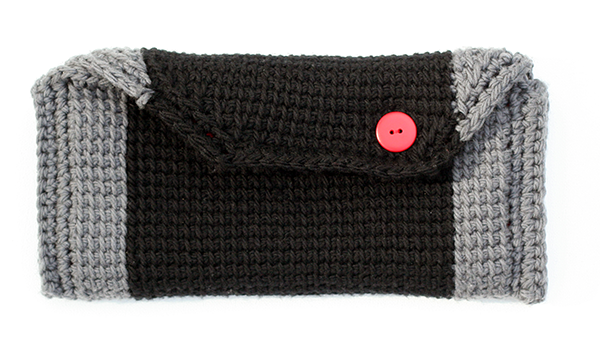
David wanted a case to protect his Nintendo Switch while traveling, so he designed one himself, as his first crochet project. Favorite this pattern on Ravelry!
Finished size
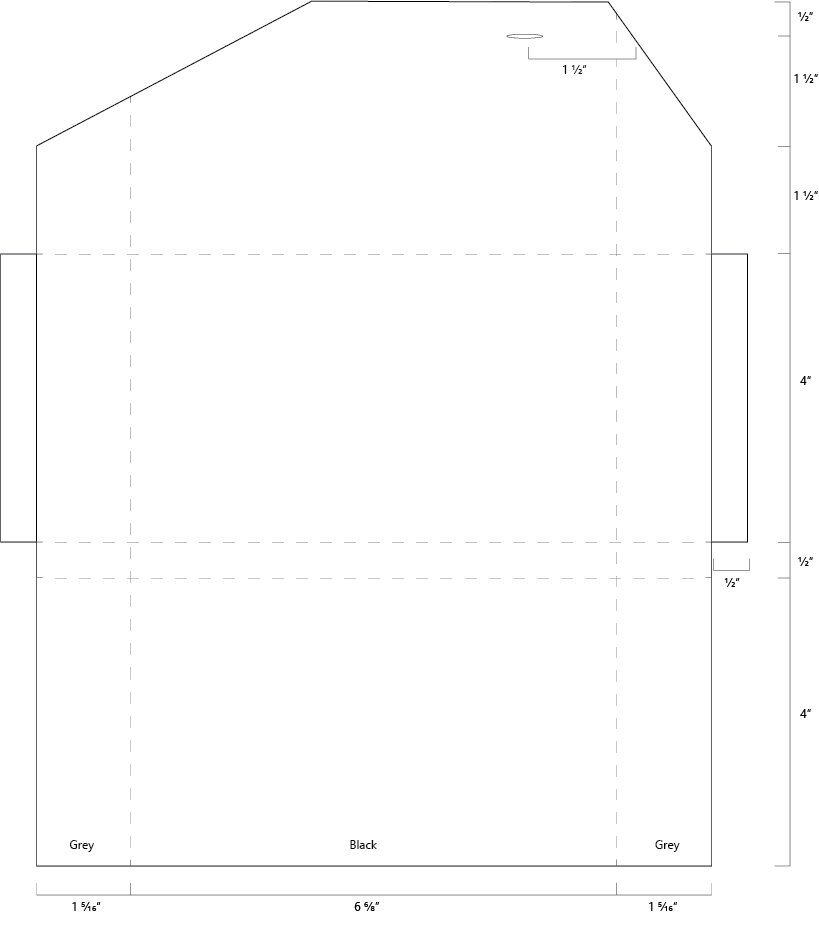
4” high and 9 ¼” long
Yarn
Quince & Co. Osprey (100% American wool; 170 yd [155 m]/ 3oz [100g]; #4): Grey (Storm 104, 1 skein; Black (Crow 102), 1 skein.
Hook
Tunisian hook size K (6.5mm). Adjust hook size if necessary to obtain correct gauge.
Gauge
17 st and 15 rows = 4” in Tunisian simple stitch on Tunisian hook size K (6.5mm).
Notions
- Yarn needle
- Thread to match yarn
- 1 button
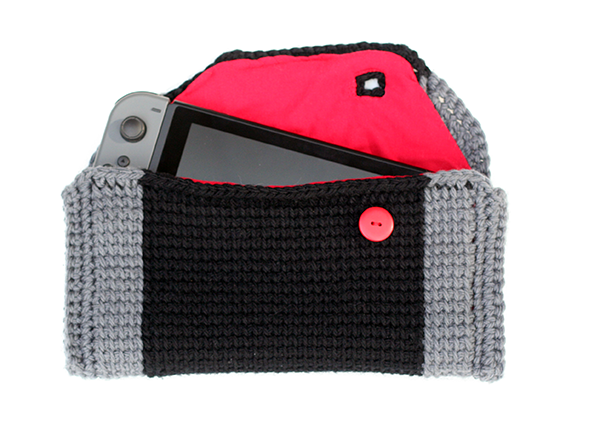
- Material to line the case (We used bamboo for the sample to prevent the Switch screen from getting scratched)
Notes
- Important: Do not carry along the grey yarn.
- Split the grey ball of yarn into two balls. You’ll use a separate ball for each side of the case. Drop and pick up the different yarn colors as you need them.
- You’ll make the case and the Side Panels separately.
- You’ll construct the case while you are crocheting the Side Panels to the case.
- Always work in the same yarn color of the stitch in the row below.
- Tip for knowing which color you should be using during the RetP: always use the color of the next vertical bar. For example, if there is a black loop on your hook and the next vertical bar is grey, pull through with the grey yarn.
Stitch Guide
- Remember to skip the first vertical bar of every Tunisian crochet row.
- Tunisian simple stitch forward pass (TSS FwP): sk first vertical bar, *insert hook from right to left behind front vertical bar, yo and pull up lp, leave lp on hook; rep from * across.
- Return pass (RetP): Yo and draw through 1 lp on hook, *Yo and draw through 2 lps on hook; rep from * across.
- TSS decrease (TSS dec): Insert hook under two vertical bars at once.
Case
With black yarn, ch 40. Add 1 more chain with grey—41 sts.
Row 1: Sk first ch, TSS FwP switching colors as follows: with grey yarn, pull up lp in next 5 ch, switch to black yarn, pull up lp in next 29 ch, switch to second ball of grey yarn, pull up lp in last 6 ch; RetP using the same color yarn as the FwP—41 sts.
Important: For the rest of the pattern, colors are not specified for each row. Follow the color pattern established in Row 1.
Row 2: TSS FwP across; RetP.
Rows 3-38: Rep row 2.
Note: Piece should measure 10” from beginning at this point. If it doesn’t, add or subtract rows until it does.
Front Flap
Note: To create the slanted sides of the front flap, you’ll decrease twice at the beginning of each row and once at the end of each row.
Row 39: TSS dec twice, TSS across until only 3 st rem, TSS dec, TSS in last st; RetP—38 sts.
Row 40: TSS dec, TSS, TSS dec, TSS across until only 3 st rem, TSS dec, TSS in last st; RetP—35 sts.
Row 41: TSS dec twice, TSS across until only 3 st rem, TSS dec, TSS in last st; RetP using black for the final st instead of gray—32 sts.
Row 42: Sk first vertical gray bar, TSS dec twice with black, TSS across until only 3 st rem, TSS dec, TSS in last st; RetP—28 sts.
Row 43: TSS dec twice, TSS across until only 2 st rem, with black TSS dec; RetP—25 sts.
Note: The gray sections are done. You’ll only work in black for the rest of the flap.
Row 44 (buttonhole row): TSS dec twice, TSS for 13 st, sk 2 st, TSS 3 st, TSS dec, TSS in last st; RetP 3 times, ch 2 over the skipped sts, finish RetP—22 sts.
Row 45: TSS dec twice, TSS across (picking up st in the buttonhole ch) until only 3 st rem; TSS dec, TSS in last st; RetP—19 sts.
Row 46: TSS dec twice, TSS across until 3 st rem, TSS dec, TSS in last st; RetP—16 sts.
Border
Sc around entire piece, putting 2 or 3 sc in each corner, depending on which you prefer.
Fasten off.
Side Panels
Make two.
With grey yarn, ch 17.
Row 1 and 2: Sk first ch, TSS FwP across; RetP.
Do not fasten off.
Finishing
- Weave in ends and block.
- Line the case with your material.
- Construct the case: Line up the top corner of one Side Panel with the edge of Row 35. Sc the Side Panel and the case together, putting 2 sc in each corner, continuing around the entire side panel except for the top. Fasten off. Repeat with the second Side panel, turning the case inside out, if needed, to make it easier.
- Fold the front flap closed and block again, if needed.
- Sew the button to the front of the case under the flap, so that it lines up with the buttonhole.
Feel free to use this pattern to make your own Switch case. If you copy the pattern, please copy it in its entirety and credit David Bastedo and Christy Lutz/canncrochet.