Making a Granny Square Using the Turning Method


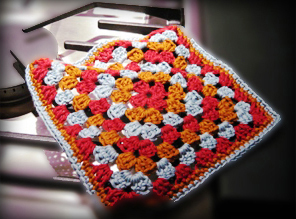
Eventually, almost all crocheters will make a project with granny squares. These beloved squares make very portable projects, use up yarn scraps and stash, and are infinitely variable. Recently, a crochet student of mine came to class with a traditional granny square pattern that she wanted to learn. Looking at that pattern, I was reminded that most traditional granny square patterns use a method that I call the slip stitch method. Years ago, I switched to a method I prefer, what I call the turning method. Crocheters who are not currently using this method can benefit from learning it, as it has many advantages over the slip stitch method, and newcomers to the granny square will find it easier to master by learning this way.

The slip stitch method stipulates slip stitching over to the corner chain space (the corner consisting of 3 dc, ch 2, 3 dc) at the beginning of each round after the first round. This method allows the granny square to be worked in the round with the same side always facing, providing the project a right side and a wrong side. Although, if you look at a project made from granny squares, there is no difference between the right side and wrong side; surely, either side could be called the right side.

Though, there is a practical reason for slip stitching in the slip stitch method. The row will always end over a cluster of 3 dc (the 3 dc clusters that make up the space between corners), and a chain space always belongs right above a 3 dc cluster. The space above the 3 dc cluster is empty of stitches, hence the need for the crocheter to work their way over to the area above a chain space, since all dcs in a granny square are made into chain spaces.

The need for slip stitching is relieved in the turning method, a method achieved by turning the work at the beginning of a new round. Once the work is turned, a chain space is immediately to the left, next to be worked. No need for slip stitching over to it. Since all stitches in a granny square are worked into chain spaces (the spaces made by the chains between the double crochets), the next round can be started immediately, without slip stitching. For round 2, the only dc clusters made are corners, so the pattern to be worked is 3 dc, ch 2, 3 dc after turning and all the way around. In all future rows, once the work is turned, the crocheter is in the middle of the row. This means that the first cluster you make is not a corner dc cluster but one of the 3 dc clusters that make up the space between the corners. The 3 dcs are worked into the chain space, and the row continues from there.

From research I did on the two methods, I discovered another benefit to the turning method. As a granny square grows larger, it tends to have a lean or curve in it when using the slip stitch method. This leaning effect is eliminated when the turning method is used.

In summary, with the turning method, round 1 sets up the chain 2 spaces in which to put the corners, round 2 forms the first corners into those ch 2 spaces, and every row after follows this generalization:

Turn;
3 dc in every ch 1 sp;
(3 dc, ch 2, 3 dc) in every ch 2 space (or corner);
ch 1 before and after every dc group including the corners.

Please note, the turning chain at the beginning of each row consists of 3 chains and will always count as the first double crochet.

I taught my student using the turning method instead of the slip stitch method from her pattern. She very quickly memorized the generalized pattern from above and implemented it perfectly. For students who like to learn the repetitions in crochet patterns and for crocheters who want to eliminate steps and the leaning effect, the turning method is a faster, better way to make granny squares.